Guides / Cost
Billet Prototype Motor Housings: What They Prove Before You Commit to Die Casting Tooling
Written by the team that reads your RFQPublished How we write these
A die for a motor housing is a big, hard to change fixed cost. Once it is cut, a missing boss, a thin wall or a wrong bearing seat position costs weeks and money to correct. That is why teams make early housings from billet, a solid block of aluminum machined to shape. Billet needs no tooling, starts in days and lets the design change between batches.
This guide explains what a billet prototype can prove, what it cannot, how to design it so the results carry over to a casting and how to plan the steps from first part to production tool.
What a billet prototype proves
- Fit and assembly. Does the stator go in, do the bearings seat, do the cover and the gearbox bolt on, do the cables reach?
- Dimensional stack up. Do the tolerances in the drawing add up to a working motor?
- Machining plan. Which features can be cut in one setup, which need a flip, and where do tolerances get hard to hold?
- Basic function. Does the motor run, spin up, hold its temperature on a short test?
- Leak path layout. Does the jacket flow as designed, even if the material differs?
A prototype at this stage is a learning tool. It earns its cost by finding errors that would otherwise be frozen into a die.
What a billet prototype does not prove
Wrought and cast aluminum are different materials, and the differences show up in tests.
| Property | Billet, 6061-T6 type | Die cast, ADC12 or A380 type | Effect on testing |
|---|---|---|---|
| Thermal conductivity | About 167 W/m.K | About 95 to 100 W/m.K | Billet runs cooler than a casting of the same shape |
| Porosity | Very low | Some, concentrated in thick sections | Leak tests on billet hide casting porosity risk |
| Strength | High, consistent | Lower and more variable | Structural and fatigue tests differ |
| Machinability | Very good | Good, with hard cast skin | Cycle time and tool wear differ |
| Surface and cosmetic | Machined finish | Cast skin | Appearance and coating differ |
| Residual stress | Moderate | Different pattern | Distortion after machining can differ |
The thermal row is the one that most often misleads teams. A motor that holds its temperature in a billet housing may run hotter in a cast one. The thermal conductivity guide explains how much the alloy matters in the whole cooling path, which is often less than feared but still worth measuring on a pilot casting.
The porosity row matters just as much. A billet jacket passes a leak test easily. A casting with the same shape may leak at a thick boss. Test the production process before the volume order. The porosity guide shows the risk areas.
Designing the billet prototype for casting
A cutter can machine shapes that a die cannot form. If the billet design ignores casting rules, the prototype proves a design that cannot be cast. A few rules keep the two aligned.
- Add draft. A die casting needs taper on walls that run in the direction of die opening, so the part can come out. Draft of one to a few degrees is normal, and the exact value comes from the foundry. Machine the prototype with the same taper.
- Keep wall thickness even. Thick sections cause shrinkage porosity. Rib and core out heavy areas rather than leave solid masses.
- Use generous radii. Sharp internal corners cause stress and filling problems. Fillets help metal flow.
- Plan the parting line and keep critical features away from it.
- Plan machining stock on every surface that is machined in production, and keep the same stock on the prototype so that later tool paths transfer.
- Use the production datums. The surfaces that a casting will give as locating points should be the ones the prototype is clamped on. Then measurements and fixtures carry over.
A foundry’s design for manufacturing review is worth having before the first prototype is cut. A short conversation can save a new tool.
A staged path from prototype to production
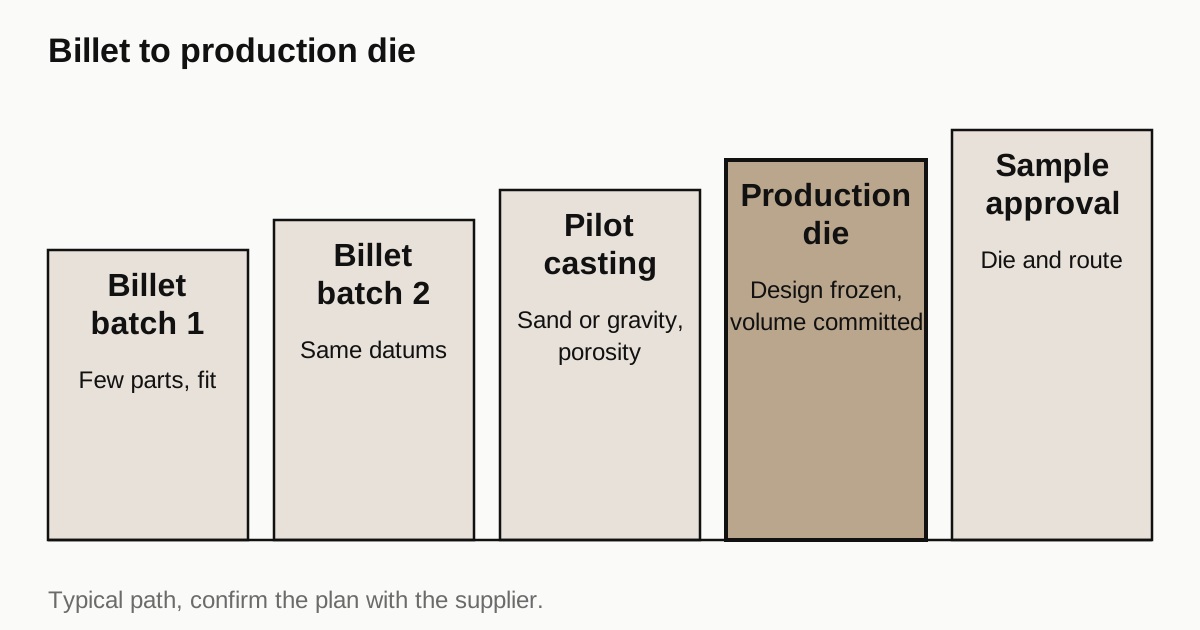
Few programs go straight from billet to a die. A common progression is:
- Billet batch one. A few pieces to check fit and assembly.
- Billet batch two after design changes, often the same shop and the same program.
- Pilot casting from soft tooling. Sand casting with printed molds, gravity casting with a simple tool or a low cost die give castings that behave like production parts, at far lower tooling cost.
- Production die once the casting design is frozen and volume is committed.
- First article and ramp. Sample approval on parts from the production die and the production machining route.
Skipping step three is the usual mistake. The pilot casting shows porosity, distortion and machining behavior in a real cast part. The guide on EV housing volumes describes how the route changes with volume.
Other prototype routes
Billet is not the only way to get an early housing. Each alternative trades speed, cost and realism differently.
Sand casting from printed molds. The mold is printed in sand and poured with aluminum. It gives a cast part with a rough skin and real casting behavior, and it needs no hard tooling. It suits complex shapes with internal passages that would be hard to machine, such as a water jacket. Surface finish and accuracy are coarser than die casting, so the part needs a generous machining allowance.
Gravity casting in a soft mold. A simple tool, often machined from aluminum or steel, makes a small batch. Cheaper than a die, slower per part.
Metal 3D printing. Laser powder bed fusion in an aluminum casting alloy produces complex shapes without tooling. It suits very small batches and shapes that no other route can make. The material has its own properties, closer to a cast alloy than to wrought, and the parts need machining on fits and sealing faces. Cost per part is high.
Machined from a casting blank of another shape. Sometimes a standard casting or a leftover blank is machined into a prototype, which is cheap when it works.
| Route | Tooling | Realism for casting behavior | Typical use |
|---|---|---|---|
| Billet machining | None | Low | Fit, assembly, first function tests |
| Printed sand casting | None | Medium to high | Jacket layouts, porosity checks |
| Gravity cast, soft tool | Low | High | Pilot batches |
| Metal 3D printing | None | Medium | Complex shapes in tiny batches |
| Production die | High | Production | Volume |
The best route depends on the question the prototype must answer. For fit, use billet. For leak and porosity behavior, use a cast route.
Need a quote for this part? Get a quote for your motor part
Tolerance expectations at the prototype stage
A prototype does not have to hold every production tolerance, and trying to do so wastes money. Decide which features have to be real.
- Hold tightly: bearing seats, stator bore, mating faces and any feature that decides fit or function in the tests.
- Relax: cosmetic surfaces, non functional radii and general dimensions that do not affect assembly.
- Report, do not just pass: ask for the measured values on the critical features. They tell the designer how close a part sits to its limits, which is more useful than a pass fail result.
Prototype shops should also say clearly where they cannot hold a callout without a special setup, so that the design team can choose whether to relax the callout or pay for the setup. Honest answers early save a round of parts.
When billet is the production route
For some products billet is not a stepping stone but the final process. If the annual quantity is a few hundred and the housing is simple, the cost of a die and a pilot casting program may never pay back, and machining from billet or from an extruded profile stays cheaper over the life of the product. The extruded profile guide compares the two machined routes.
The honest way to decide is to ask for production volume quotes from both routes at the start, before the prototype is made. A shop that sees the full volume plan can advise early whether a die makes sense, and if it does not, can help optimize the machined design for the long run.
Cost thinking
Billet prototype cost per part is high, since the shop removes most of the block and spends hours machining. That cost is acceptable for a handful of parts. The thing to watch is how many rounds the program needs. Each round has a cost, and a fast, well documented first round reduces the number of rounds.
| Item | What drives it |
|---|---|
| Billet material | Size of the block, alloy, price of aluminum |
| Machining time | Number of setups, pockets, cycle time per feature |
| Fixtures | Prototype shops use flexible fixtures, which add setup time |
| Inspection | CMM report on critical features |
| Finish | Anodize or coating, with masking |
| Lead time | Days to a couple of weeks |
Ask for a price for one, five and ten pieces, since the setup cost is shared across the batch. The cost guide explains the pattern.
What to put on the RFQ
- State that the part is a prototype for a later die casting, and name the intended production alloy.
- Give the drawing with datums that match the future casting.
- Mark the features that are critical to fit and function.
- State the tolerance level. A prototype rarely needs production capability data, only the dimension of critical features.
- Ask the shop to report measured values on critical features, so that the design team sees the margin.
- Give the delivery date, since prototypes are about speed.
- Mention how many revisions are expected and whether the same shop can keep the program.
Checklist before you send the RFQ
- State the prototype purpose and the planned production process.
- Apply casting design rules to the billet drawing.
- Choose the datums the production casting will provide.
- Ask for measured data on critical features.
- Ask for pricing at one, five and ten pieces.
- Plan a pilot casting before the die order.
When the drawing is ready, send the RFQ and we quote the finished parts and place the work with a partner shop that machines prototype motor housings. Replies come within 24 business hours.
Standards and references
- Die casting, overview of the process, tooling and typical alloys. Why a die is a large fixed cost and what shapes it allows.
- Prototype, overview of prototyping purposes and methods. General background on what a prototype is meant to prove.
- Machining, overview of subtractive processes. The route used for billet prototypes.
- Thermal conductivity, overview with values for common materials. Reference ranges that show why wrought and cast aluminum differ in cooling tests.
Figures on this page are typical ranges drawn from the standards above and from ordinary shop practice. They are not a specification for your part. The partner shop that prices your part confirms what it can hold on your geometry.
Frequently asked questions
How many billet prototypes should I make before ordering a die?
Enough to settle the geometry that the die will freeze: usually a first batch to check fit and assembly, then a second after changes. For many programs that is a handful of parts per round and two or three rounds. A die is hard to change, so it is better to find problems on billet.
Will test results on a billet housing match a die cast one?
For geometry and assembly fit, yes if the datums are the same. For thermal, strength and porosity related tests, not exactly, because wrought aluminum differs from cast aluminum. Interpret the results with that in mind, and confirm on a pilot casting.
Can a die cast design be machined from billet unchanged?
Mostly yes, as the cutter can follow almost any shape a casting has. The reverse is not true: a billet design with sharp internal corners, no draft and thick walls may be impossible or costly to cast. Design the billet prototype with casting rules in mind.
Need a quote for this part?
Send the drawing. We quote the finished parts, place the work with a partner shop and reply within 24 business hours.
Get a quote for your motor part